Style
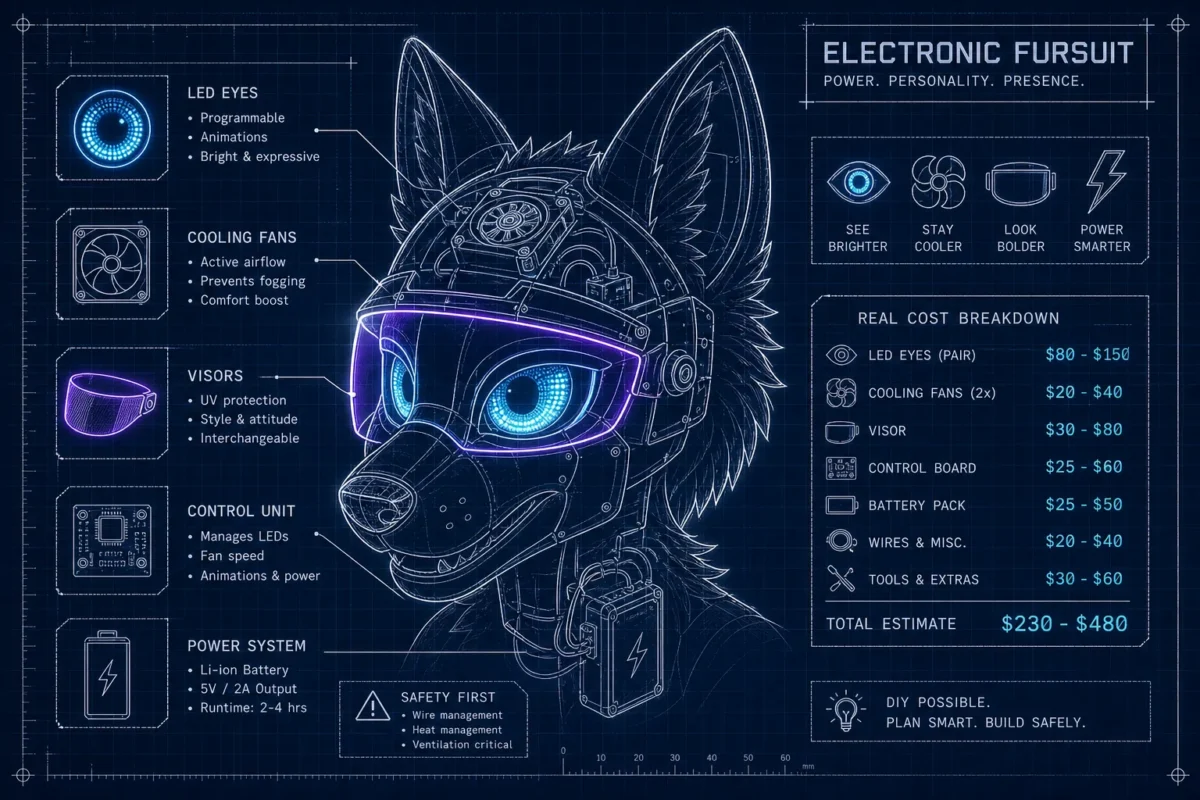
Electronic Fursuit: LED Eyes, Fans, Visors & Real Costs
Jun
Picture a convention floor on a Saturday afternoon: the crowd shuffles past booths and banner walls, then suddenly splits. Something’s coming through with glowing eyes that blink and shift, a visor face cycling through animated expressions, and a quiet hum of internal fans. That’s an electronic fursuit in its natural habitat, and the reaction it gets from a crowd is nothing like what a standard foam-and-fur build produces. It doesn’t just represent a character; it performs one.
This article covers everything you need to know before spending a cent on fursuit electronics. You’ll get a clear breakdown of what’s actually inside a wired build, why the Protogen species became the gold standard for this aesthetic, how the electronics change what it feels like to wear a suit, and how to decide between doing it yourself versus commissioning a maker. Real cost data is included so you can budget honestly, and sourcing options are covered for both components and complete builds.
What Actually Goes Inside an Electronic Fursuit
Most people see the glow and assume it’s a simple string of lights. The reality inside a high-end electronic fursuit build is considerably more interesting than that, and understanding the components helps you evaluate any build or kit with real confidence.
LED Eye and Visor Systems
The simplest LED eye setups use dome-top LEDs wired to a resistor and battery pack, producing a static colored glow. Step up from there and you get RGB-controlled arrays driven by addressable WS2812B strips, which allow color cycling and brightness control from a single data line.
The most complex tier uses LED matrix panels, either MAX7219-style grids or full RGB matrix panels, managed by an Arduino or Raspberry Pi to display animated expressions, scrolling patterns, and reactive face changes. For Protogen builds specifically, the visor face uses these matrix panels behind a translucent shell, and programming them means writing custom sketches with libraries like RGBmatrixPanel or FastLED, or using Bluetooth app control for simpler premade animations. Builders sourcing parts for this tier should look for LED fursuit kits that bundle the matrix panels, controller board, and power management into a single package, which cuts integration time significantly versus sourcing every component separately (see our guide: LED Fursuit Eyes: Best Kits, Styles, and Install Tips).
Cooling Fans and Ventilation
Internal fans are the quality-of-life upgrade that wearers notice most immediately. A small 5V blower fan or compact axial fan in the 40mm to 60mm range, delivering roughly 15 to 20 CFM, handles the dual job of moving warm air out and preventing visor fogging during extended wear. Placement matters: most makers position fans to exhaust air upward or through the back of the helmet, away from the wearer’s face. At a full convention day of eight-plus hours, a properly placed fan is the difference between tapping out after two hours and making it through the full day.
Sound Systems and Reactive Lighting
Sound-reactive LED setups use a microphone or sound detector module to feed audio data to an Arduino, which then drives the LED strips to pulse, flash, or animate in response to music or ambient noise. The FastLED library handles most of the animation logic on the code side. Some builders also incorporate EL wire fursuit lighting for ambient accent glow along seams and panels, since EL wire is flexible, low-heat, and easy to route through tight costume spaces. Embedded speakers for character voice effects sit at the more advanced end of the add-on spectrum. These features are genuinely impressive but they require real electronics knowledge to implement cleanly, which is exactly where the DIY-versus-commission question becomes important. For hands-on builders, a useful walkthrough for a basic sound-reactive LED setup is available in the Sound-Reactive LEDlights With Arduino tutorial, and commercial options for sound-reactive strips are sold by vendors such as Hyperspace Light’s sound-reactive lights.
The Protogen Blueprint: Where Electronic Design Is the Whole Point
Most fursuit species treat electronics as an optional upgrade bolted onto an existing design. Protogens are different at the species level. The Protogen design is built around a visor-style helmet face with a geometric, screen-like display that suggests a living technological entity. The glowing visor, the bio-gear accents, the sleek helmet shell: these aren’t decorative additions. They are the character. That’s why Protogen suits consistently represent the leading edge of what a wired costume can do visually and technically.
How Ruby Protogen Studios Executes This at a Professional Level
At Ruby Protogen Studios, the electronics and the character aesthetic are engineered together from the first design session, not assembled separately and merged at the end. Custom Protogen helmets from the studio integrate LED visor displays, internal ventilation systems, and addressable lighting into builds made for convention wear and photography. The result is a suit where every glowing element belongs, because it was designed to be there rather than retrofitted after the fact. Browsing the premade inventory gives you a clear picture of what a professionally integrated electronic fursuit build looks like at various configuration levels, and the custom commission process is the path for buyers creating a specific character with a personalized design.
How Electronic Features Change the Wearing Experience
The visual impact of a wired build is obvious from the outside. The electronics also change what it feels like from the inside in ways most coverage skips.
Visibility, Expressiveness, and Crowd Presence
Animated eyes and visor displays give a suit a live quality that no static foam face can match. The suit reacts, shifts, and responds in a way that registers as personality rather than prop. LED lighting also reads dramatically well in low-light convention halls, and for content creators, photographers, and streamers, a wired build performs on camera in a completely different category from a non-electronic head. The contrast and depth that LED elements add to photos and video are significant enough that many content creators treat electronics as a core feature rather than a luxury.
Comfort and Performance During Extended Wear
Internal cooling fans directly address heat buildup, which is the single most common physical complaint from fursuit wearers at conventions. A well-integrated fan system extends comfortable wear time substantially, which matters when you’re suiting for photos, panels, and hallway interactions across a full convention day. The other comfort factor is maintenance design: suits where electronics are built as removable, modular assemblies allow the soft components to be washed separately and the electronics to be serviced without taking the whole build apart. This is a detail that separates thoughtfully engineered builds from suits where the electronics were added without a long-term plan.
DIY Kits vs. Commissioning a Custom Electronic Build
The honest answer here depends on your skill set and your patience, not just your budget.
What DIY Kits Include and What Skill They Require
A sound-reactive LED build uses an Arduino Uno or Nano, a sound detector module, WS2812B LED strips, resistors, a breadboard or PCB, jumper wires, and a 5V power bank. Entry-level animatronics kits use a pre-programmed PICAXE 08M2 microcontroller and a small speaker to drive motion and light effects. The raw component costs are genuinely low: LED parts for a basic eye setup can run under $15 for the electronics themselves. The expensive part of DIY is time and skill. Wiring, housing, controller programming, integration into foam-and-fur construction, and making the whole thing survive convention wear all require real hands-on electronics experience. Many first-timers find themselves three months in with an unfinished helmet and a growing pile of spare components. For hands-on learners, community tutorials and step-by-step guides like the Robotsynth-style fursuit head guide can accelerate the learning curve.
When Commissioning a Maker Is the Smarter Move
If you want a Protogen visor that animates cleanly, stays wearable for eight convention hours, and looks like it was always part of the design, commission a maker who builds this full-time. The skill gap between a functional breadboard prototype and a convention-ready wired helmet is significant, and the gap between a convention-ready helmet and a photography-grade build is even larger. For buyers who already own a base suit, retrofitting electronics is a middle-ground option: makers like Atomic Fursuits’ custom electronics offer retrofit services to add LED eyes, fans, or other systems to existing builds. For buyers who want a complete, purpose-built electronic Protogen designed and constructed as a cohesive whole, Ruby Protogen Studios’ custom commission process sets the standard for how this should be done.
Real Costs and Battery Safety for Wearable Electronics
Electronics add-on pricing spans a wide range depending on complexity. These figures represent what makers and experienced DIY builders actually spend, not manufacturer list prices for bare components.
A Realistic Budget Breakdown by Feature
These are add-on costs to a base build, not standalone product prices:
- LED eyes: $100 for simple dome-top glow effects; $250 for Arduino-controlled RGB animated setups
- LED strip systems: $400 for a basic dumb-strip setup; $650 to $800 for smart addressable strips with high-density COB configurations
- Motorized ears or small moving parts: around $350 for Arduino-servo-controlled mechanisms
- Motorized tails or large actuated elements: $1,000 and up for servo-controlled builds with 12V motor systems
Commission pricing climbs quickly once wiring, housing, integration labor, and materials compound on top of the raw electronics cost. Budget accordingly and treat the component-only price as a floor, not a ceiling.
Battery Types, Runtime, and What to Never Do While Wearing
LiPo and Li-ion batteries are the standard choice for compact wired builds because of their high energy density and lightweight form factor. NiMH in AA format is a practical alternative for lower-complexity builds where simplicity and safer handling matter more than size. One rule has no exceptions: never charge a LiPo while wearing the suit. Lithium batteries generate heat during charging, and enclosed foam-and-fur construction traps that heat with no safe exit. Always use protected battery packs with a built-in battery management system that covers overcharge, over-discharge, and short-circuit protection. For guidance on selecting the right pack and chemistry for wearable projects, see the how to choose batteries for wearables primer. Position batteries in accessible, low-movement areas of the costume, padded and away from the hottest zones near the head. Modular, removable battery assemblies are the correct engineering approach because they allow the suit’s soft components to be washed while the electronics stay dry and serviceable.
Where to Find Electronic Fursuit Components and Builds
The market for fursuit electronics is fragmented between component sellers, retrofit services, and full custom makers. Knowing which category you need saves time.
Parts, Kits, and Component Suppliers
FursuitSupplies.com functions as a dedicated one-stop shop for fursuit electronics, fans, LEDs, and related components, making it a solid starting point for DIY builders sourcing parts. Etsy carries handmade electronic fursuit pieces from individual makers, though quality and availability vary significantly by seller. Arduino-compatible microcontrollers and WS2812B LED strips are widely available through general electronics retailers for builders going the fully custom route. For retrofit services on an existing suit, Atomic Fursuits specifically offers electronic component additions and system integration for builds that already have a base. If you need custom soft-parts built around electronics, consider ordering specialized components like paws via the Custom Paw Order, Design Your Unique Fursuit Paws page to ensure fit and routing for your wiring harnesses.
Commissioning a Full Electronic Fursuit Build
For buyers who want a complete, professionally integrated electronic fursuit rather than a component sourcing project, Ruby Protogen Studios is built for exactly this work. The studio’s focus on the Protogen aesthetic means the LED systems, ventilation, and bio-gear details are designed as a unified build rather than assembled from unrelated parts. Premade inventory is available for buyers who want something ready to ship now. Custom commissions are the path for buyers who want a personalized design built to their character. Browse the current inventory or start a commission inquiry to see what a professional electronic Protogen build actually looks like before you commit to any other path. For an example of an in-stock option that pairs electronics-ready design with immediate availability, review the studio’s Protogen Premade Fursuit Partial (Head, hand paws, and large Tail with belt) offering.
Making the Right Call for Your Build
An electronic fursuit uses LED systems, internal cooling fans, sound-reactive lighting, and animated visor displays to turn a costume into something that performs rather than just represents. The Protogen species is the clearest example of a character designed around electronics at the concept level, where the glow isn’t added on but built in. DIY is achievable with real electronics skills and patience; commissioning a specialist maker produces more reliable results and removes the skill and time cost from your side of the equation.
Costs range from around $100 for simple LED eye glow effects up to $1,000 and beyond for actuated moving parts, with LED matrix visor systems and full wiring harnesses sitting in the $400 to $800 range depending on configuration. Battery safety is non-negotiable: use protected LiPo packs with BMS, never charge while wearing, and design for modular removal from the start.
Whether you’re planning your first convention suit or upgrading an existing build, a well-executed electronic fursuit with an integrated visor, internal fans, and a properly managed battery system will outperform any last-minute electronics add-on every time. Ruby Protogen Studios is ready when you are.