Style
LED fursuit head: what sets it apart from standard builds
Jun
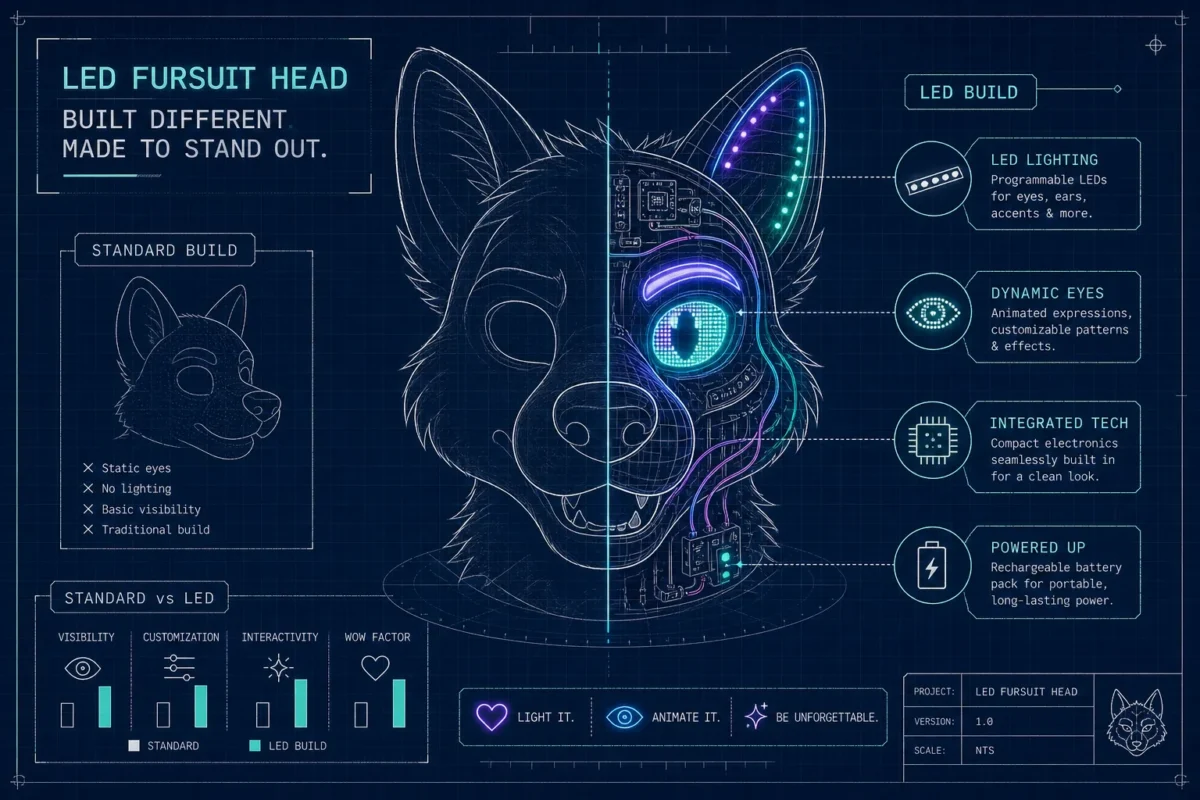
Walk into any major furry convention and you’ll spot one immediately: a head in the crowd where the visor is glowing, the eyes are shifting through expressions, and the whole face looks less like a costume and more like a living screen. That moment of recognition is what separates an LED fursuit head from every standard foam-and-fur build in the room. The difference isn’t cosmetic. The internal architecture, the material choices, the power system, and even how you physically wear the head are fundamentally different once electronics enter the build.
Standard heads are built around foam armatures, hot glue, and fur. LED heads are built around the technology first, with everything else designed to support it. Some studios design the visor, LED panel, controller, and breathable liner as an integrated system rather than assembling them from separate purchases after the head is already finished. That approach is what this article unpacks. By the end, you’ll understand exactly what goes into a quality LED fursuit head, what separates a build that wows a convention hall from one that fails mid-afternoon, and whether buying a finished build is the smarter call over attempting it from scratch.
What actually changes when you add LEDs to a fursuit head
A standard foam-and-fur head doesn’t need access panels, organized wiring channels, or airflow management for components. The builder shapes foam, adds fur, and moves on. The moment you introduce electronics, every one of those assumptions breaks down. The head now needs a support structure that holds components in place, routes wires cleanly, and allows access for battery swaps and maintenance. Retrofitting a standard head for electronics is possible, but it typically results in compromises compared with a head designed for electronics from the start. The foam placement, the visor cutout geometry, and the interior space all need to account for what’s going in there before the build begins.
The wearable experience shifts too. A battery pack and controller add weight, and that weight needs to be balanced so the head doesn’t pull forward or sit unevenly on the wearer’s shoulders. Heat and moisture from breathing accumulate inside any fursuit head, but electronics raise the stakes: trapped humidity around a controller board or wiring harness leads to corrosion over time. A well-designed LED head addresses this through ventilation gaps around components and a removable inner carrier for the LED assembly, so the electronics come out cleanly for drying after every wear session.
LED fursuit head visors: types and how they shape the effect
The visor is the interface between your LEDs and the outside world, and its material determines whether the effect looks sharp or muddy. Three main approaches are used in LED heads, and each one produces a visually distinct result. Getting this choice wrong means your LED investment won’t read the way you expect it to from five to ten feet away in a crowded convention hall.
Mesh visors are breathable and reduce fogging, but they scatter light. The perforated structure breaks up the glow, so the face reads as a lit pattern rather than a smooth lens. Acrylic panels transmit light more cleanly and can be tinted for glow effects without washing out colors, but they show glare and reflections more readily than other options. Screen-style visors, commonly used for Protogen-style heads, use a flat semi-transparent or opaque surface that acts as a diffusion layer. That diffusion surface is what makes the LED output look like an actual display rather than visible dots of light behind plastic.
Diffusion material matters more than raw LED brightness. A high-output LED behind poor diffusion still produces hot spots and uneven glow that look unprofessional in photos and in person. The right diffusion layer spreads light evenly across the visor surface, makes lower-power LEDs punch well above their wattage, and gives animated fursuit eyes the clean, readable expression quality that makes them worth building in the first place. Brightness is easy to increase; uneven light distribution is a structural problem that no amount of wattage fixes.
LED panels and the controllers that animate them
For animated fursuit eyes, thin LED matrix panels are the most practical choice in 2026. They’re flexible, lightweight, and designed specifically for wearable builds.
WS2812 vs. APA102: choosing your pixel type
WS2812 (NeoPixel-compatible) addressable LEDs are the most common choice for custom eye and effect lighting because they chain from a single data line and benefit from a large library of community software. Best practices for using WS2812 LEDs, including wiring, level shifting, and power injection, are widely discussed in maker communities and are worth reviewing before you pick your pixel type. APA102 LEDs use a separate clock line for more reliable timing at higher animation speeds, making them a strong option for builds that need fast, smooth expression changes. Fixed LED panels trade animation flexibility for even illumination and a cleaner screen-like appearance behind diffusion material. Fursuit LED kits built around either pixel type are widely available, so your choice comes down to how much animation complexity you want to support.
Controller types: from no-solder to fully custom
The controller determines what the electronics can actually do. Bluetooth LED matrix panels are the most accessible entry point: no soldering, no programming, and expression switching from a phone app while wearing the suit. Premade PCB controller kits come with a wireless remote, pre-loaded animations, and a micro SD card slot for custom eye designs, with features that vary by vendor but typically require minimal technical setup. A no-solder LED panel paired with one of these kits is a realistic option for first-time builders who want animated eyes without committing to a coding project. For a hands-on primer on how animated electronic eyes are typically implemented, the Adafruit animated electronic eyes tutorial is an excellent reference. Arduino and Teensy setups offer the most customization, including reactive eyes, blinking triggers, and fully custom animation logic, but they demand coding knowledge and more complex wiring. The controller choice is essentially a decision about how much technical work you want to own versus how much you want handled for you.
For builders who prefer a turn-key solution, check a concise overview of kit options and installation tips in our LED fursuit eyes: best kits, styles, and install tips guide.
Ruby Protogen Studios’ LED Protogen helmets use integrated panel systems where the visor, the LED matrix, and the controller are built and tested together as a finished unit. That means the expression animations work correctly from the moment the head ships, with no workbench troubleshooting required after it arrives. For an independent walk-through of Protogen-style LED electronics in a fursuit context, see this Protogen fursuit LED electronics guide.
LED fursuit head power: batteries and realistic run time
WS2812 and most LED matrix panels run on 5V, which makes USB power banks the most practical battery option for the majority of LED fursuit heads. The voltage is already regulated, the form factor fits inside a head cavity or clips to a belt harness, and capacity options are wide. Many light-duty builds can run multiple hours from a 5,000 to 10,000 mAh power bank, though actual run time depends on LED count, brightness settings, and animation patterns. Small lithium battery packs work when space is tighter, and four AA batteries are a viable option for low-draw builds, though they require a step-down regulator or voltage divider to manage the voltage difference safely.
If the battery source delivers more than 5V to a 5V LED system, a step-down regulator belongs in the circuit before the LEDs. Skipping that step causes early component failure. Use quick-disconnect connectors between the head and the battery pack so the power source can be swapped without tools at a convention. Keep all wiring strain-relieved along internal seams so head movement doesn’t pull on solder joints over time. For practical community discussion on powering remote-controlled LED suits and how builders handle wiring and battery placement, review the Arduino community thread on battery power for remote-controlled LED suits. The most common mid-event failures in LED fursuit heads come from wiring stress, not component failure, and strain relief is the easiest prevention.
Why a finished LED fursuit head beats a DIY build
A basic DIY LED fursuit head setup can run roughly $245 or less in components alone for a starter configuration, and that figure doesn’t include tools, failed prototypes, or the time required to learn controller programming, fit everything into a wearable form factor, and achieve even diffusion behind the visor. Off-the-shelf fursuit LED kits range from $25 to $98 but require integration work that most first-time builders significantly underestimate. The most common failure points, noise in wiring, underpowered batteries, and poor diffusion, are all invisible until the build is complete and you’re already at the convention.
The core issue is that DIY builds assemble components that were designed independently. The LED panel doesn’t know the visor’s diffusion properties, the controller doesn’t know the head’s internal geometry, and battery placement gets figured out at the end rather than engineered from the start. Each of those gaps is where problems live. A purpose-built LED fursuit head from a studio that specializes in this construction eliminates those gaps because every component decision is made in relation to the others.
Ruby Protogen Studios builds each LED Protogen helmet as a complete, tested system. The visor, the LED panel, the controller, the power wiring, and the breathable interior liner are all designed together, then verified as a unit before shipping. Custom character designs, worldwide shipping, and the option to commission a build around a specific fursona make it a full-service option rather than just a product off a shelf, one built to hold up through a full convention day, not just a workbench demo. Browse the available options like the Protogen Bunny custom DIY bunny-eared helmet or inquire about a tailored commission.
Maintaining an LED fursuit head: keeping electronics alive
A well-built LED fursuit head can last for years with the right maintenance routine. The foundational rule is treating the electronics as removable parts from day one. Mount LEDs on removable carriers rather than gluing them into the fur or foam so the assembly comes out cleanly for drying and servicing. Keep a small air gap between LED components and the surrounding foam to reduce heat buildup during extended wear sessions.
Before any cleaning, remove the LED assembly, controller, and battery completely. Spot-clean the fur and liner separately with the electronics fully out of the head, reassembling before the interior is completely dry is the fastest route to connector corrosion and eventual shorts. Never expose wiring harnesses or controller boards to direct moisture. After every convention wear, air the head out before storing it. That single habit, done consistently, prevents most of the long-term failures that show up in LED fursuit heads that otherwise had excellent builds.
The build that makes the difference
An LED fursuit head is a fundamentally different object from a standard foam-and-fur construction, and the difference runs through every layer: visor material, LED type, controller choice, power management, and interior architecture. The gap between a build that commands attention across a convention hall and one that fails before the afternoon panel comes down to how well those layers were designed to work together from the start.
For buyers who want that result without the trial-and-error learning curve, a purpose-built LED fursuit head from a studio that specializes in this construction is the direct path. Ruby Protogen Studios’ LED Protogen helmets represent what this technology looks like when every component decision is made with the complete build in mind. Browse the premade inventory or start a custom commission inquiry to see what’s available for your character.