Style
Fursuit beginner guide: types, costs, and how to start
Jun
You see it happen at every major convention. Someone spots a fully lit Protogen across the hall, stops mid-step, and spends the next ten minutes trying to find out where to get one. That moment is the beginning of a very fun rabbit hole, and one that gets overwhelming fast. The information is scattered across Discord servers, old forum threads, and YouTube videos filmed in people’s garages, and the options are far wider than most newcomers expect.
This fursuit beginner guide is your starting map, whether you want to build your first suit from foam and faux fur or buy one ready to wear. Ruby Protogen Studios offers premade Protogen pieces at multiple price points alongside fully custom builds, so there is a real path forward no matter where you are starting from.
Here is what we are covering: the main fursuit types, real cost numbers for both making and buying, the basic DIY construction workflow, common beginner mistakes to skip, and the resources that will carry you through your first build or commission.
Fursuit beginner guide: what type of suit is right for you?
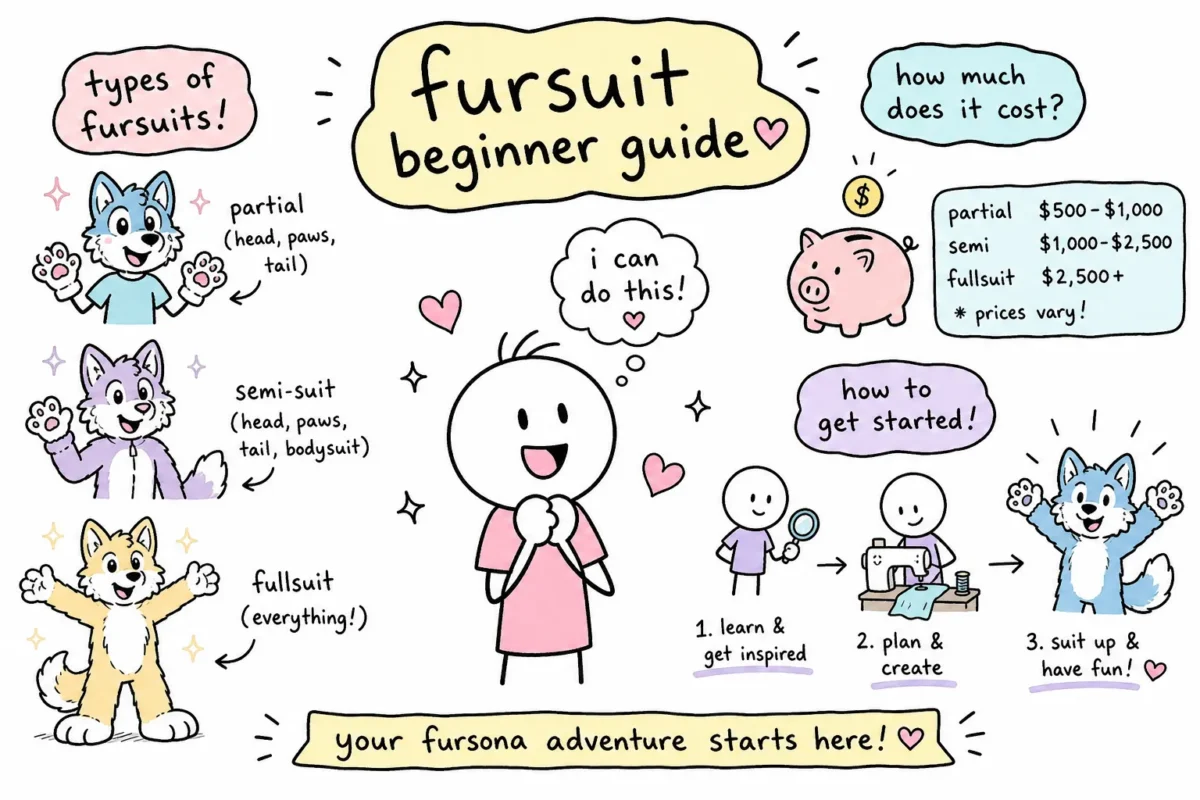
Before you spend money on materials or put down a deposit anywhere, you need a clear mental picture of the options. Fursuit categories are not all that complicated once you strip away the jargon, but mixing them up leads to real budget surprises later.
Partial suits vs. full suits: the real difference
A partial suit typically includes the head, paws, tail, and sometimes arm sleeves or a simple bodysuit base, while a full suit covers head to toe with a complete bodysuit, feet paws, and tail. Many beginners start with a partial because it costs less, stays cooler during long convention days, and is far easier to pack and store. The practical bonus is that a well-made partial can be expanded into a full build later if your character calls for it, so you are not locked into one path from the start.
Protogen, kemono, and traditional styles
Traditional fursuits use digitigrade leg padding, realistic animal proportions, and hand-sewn fur work throughout. Kemono suits go the opposite direction: rounder shapes, an anime-inspired aesthetic, and large flat faces that photograph beautifully. Protogen suits sit in their own category entirely, part organic animal character and part bio-mechanical sci-fi design, built around a flat visor-style LED head instead of a carved foam snout. Protogens have surged in popularity because the visor face simplifies certain construction decisions while the LED elements absolutely light up a convention floor and look incredible in photos and video content.
Premade vs. custom: two very different timelines
Premade fursuits are finished suits available to buy and ship immediately. Custom commissions are built from scratch to your specific character design and can take anywhere from two months to well over six months depending on the studio’s queue. For beginners still figuring out their fursona or working within a tighter budget, premade tends to be the smarter first step, you get a tangible piece in hand without committing to a long wait. For those with a clear character concept and the patience for the process, a custom build is worth the investment.
What fursuits actually cost: making vs. buying
Guessing at budget is one of the fastest ways to get burned in this hobby. Here are real numbers for both paths so you can make an actual decision.
The DIY material budget for a first build
A beginner building a partial fursuit head and basic body from scratch should expect to spend roughly $200 to $300 on materials alone, not counting tools. Faux fur runs $25 to $50 per yard and a head typically needs 1.5 to 2.5 yards. Supplementary supplies, upholstery foam, glue sticks, thread, eye mesh, and felt, add another $40 to $80, though that estimate varies depending on your supplier and region. Tools like scissors, a utility knife, and a high-temp hot glue gun are a one-time investment, typically in the $30 to $60 range at entry level. That $200 figure is the floor, not the ceiling, especially on a first attempt where material waste is common and do-overs happen.
What buying premade and commissioning custom actually costs
Premade Protogen heads and partial suits from independent and studio makers are commonly priced in the thousands, Protogen heads frequently run $2,000 to $3,500 or more, and partials often start at $4,500 and climb from there depending on complexity. Mid-range full custom builds from established studios typically start at $1,500 for simpler characters and climb past $3,000 for detailed designs with electronics. Premium custom builds with LED systems, breathable ventilated interiors, and character rights packages reach $4,000 or more, and Protogen suits with functioning LED visors sit firmly in that mid-to-premium range because of the electronics component. Custom commission timelines at a reputable mid-range studio usually run two to six months from deposit to delivery, with three to four months being the most common window for a partial or simpler full suit.
Where Ruby Protogen Studios fits for beginners
Ruby Protogen Studios is built for exactly this moment: the first-time buyer who wants a high-quality Protogen piece without having to navigate the full custom commission process alone. The studio’s premade shop spans product categories including premade Protogen partials (head, paw, and tail), ears, full suits, and outfit sets, so you can browse ready-to-ship options today or open a custom commission slot for something designed around your specific character. Premade entries from the studio let beginners get into a quality Protogen build at a lower price point than a full custom, making it one of the most accessible starting points in the Protogen niche. Worldwide shipping also makes the studio a real option for buyers outside major US convention markets who want a professional build without the local shortage problem.
Essential tools and materials for your first DIY build
If you are going the DIY route, the goal here is to buy exactly what you need and skip the impulse purchases that inflate your material budget before you cut a single piece of foam.
Your core beginner toolkit
The minimum viable toolkit for a first fursuit head breaks down into two groups. For cutting and shaping, you will need upholstery foam, sharp scissors, a utility knife or razor blade, a soft measuring tape, a marking tool like a Sharpie or chalk, and duct tape with scrap paper for patterning. For materials and adhesives, stock up on faux fur, a high-temp hot glue gun with extra sticks, strong thread and hand-sewing needles, pins, and eye mesh or buckram for vision openings. Most of these are one-time purchases that will last through multiple builds. The two areas where you should not cut corners are foam density and glue temperature: high-density foam and high-temp glue directly determine how long your suit holds its shape.
Choosing the right foam, fur, and adhesives
Foam thickness varies by area: many experienced makers use a mix of half-inch, one-inch, and two-inch foam across a single head, with thicker cuts for the main structure and thinner foam for detail work like brow ridges and ear shaping. For faux fur, pile length matters more than most beginners realize: longer pile hides seams naturally but is harder to sew cleanly, while shorter pile makes detailed character markings crisper. Hot glue is the beginner standard for assembly, but some makers recommend contact cement or reinforced stitching in high-stress areas like the base of the muzzle and around the eye openings. For vision openings, buckram or eye mesh is the standard go-to because it holds its shape and lets the wearer see clearly without exposing their face.
The basic fursuit head workflow, step by step
The process only feels mysterious until you see the sequence laid out plainly. Every beginner head follows the same stages, and once you understand the order, the whole thing gets a lot less intimidating.
Measuring, patterning, and shaping the foam base
Start with three measurements before cutting any foam: head circumference at the brow line, top-of-head to chin, and neck circumference. These three numbers determine how large your foam base needs to be. From there, use the duct tape patterning method: wrap your foam base in two layers of tape, mark cut lines and fur direction directly on the tape, peel it off, and transfer the shape to pattern paper. For the foam itself, cut a tube or bucket shape sized to fit your head comfortably, add a separate muzzle block, build up cheeks and a brow ridge, then carve and refine the silhouette with scissors or a razor until it matches your character. Budget four to fifteen hours here on your first attempt, it always takes longer than it looks like it should. For a step-by-step reference you can follow along with, see this tutorial on building a fursuit head with foam that walks through the common foam-blocking and patterning approach.
Furring, eyes, and finishing the head
Cut your fur panels with pile direction aligned, brushing the pile toward the nose on a typical animal face for the cleanest result. Hand-sew or machine-sew your panels together first, then glue them onto the foam base with pile direction consistent across the whole head. Add eye mesh or buckram to your vision openings, then attach painted or resin eyes over the top. Line the interior mouth and ear cavities with felt or fleece so everything touching the wearer’s skin is smooth, then finish with final details: nose, teeth if the character calls for them, whiskers, and a final seam cleanup. This stage typically runs twelve to thirty hours spread across multiple sessions, so plan for at least two weekends on your first build. For additional guidance on finishing touches and tidy fur paneling techniques, this Crafting a Fursuit Head 101 article is a compact, practical resource.
Common beginner mistakes and how to prevent them
These are the errors that show up in almost every first build. Knowing them in advance saves you the frustration of catching them after the fur is already glued down.
Ventilation and visibility problems
Ask anyone who has worn a suit for more than an hour: heat buildup is the complaint that comes up every time, and it almost always traces back to construction choices made before the fur went on. A closed muzzle, no eye vents, and no airflow path through the ears trap heat fast and make the suit genuinely uncomfortable within minutes. The fix is proactive: hollow out the muzzle as much as the structure allows, size eye openings generously, and consider small ear vents or a compact battery-powered fan tucked into the interior. Visibility follows the same principle, eye openings that are too small or blocked by fur pile are a real safety issue at busy conventions. Size them for the wearer’s actual sightline, test-fit the head before furring, then test it again after.
Glue, seam, and fit errors that beginners skip past
A handful of construction errors show up in almost every first build, and they are all preventable. Scratchy interior seams happen when raw edges touching the wearer’s face or head are left unfinished, cover them with fleece lining and the problem disappears. Visible or lumpy hot glue on the outer surface comes from gluing too fast or not hiding glue lines inside the fur layer. Patterns cut too small with no seam allowance produce a tight head that worsens heat, limits visibility, and puts stress on every seam at once. The single habit that prevents all three is test-fitting before anything becomes permanent. Do not rush through the patterning stage to get to the parts that feel more exciting.
How to find a reputable fursuit maker and where to learn more
Whether you are buying or commissioning, doing your homework before committing protects both your investment and your timeline.
What to look for when evaluating a fursuit studio
A reputable studio has a clear portfolio showing multiple finished suits from different angles, not just one polished hero photo. Look for transparent commission terms including realistic timeline estimates, revision policies, and clear communication about materials and electronics for LED builds. Consistent buyer reviews or a visible reputation within the convention community adds another layer of confidence. Be cautious of any studio that requests full payment upfront with no milestones or written terms; custom fursuit commissions are significant investments and a professional studio will structure the process accordingly.
Communities and tutorial resources worth bookmarking
For DIY builders, the best starting stack is Matrices for foundational reading and linked resources, Elk Dragon or Kloofsuits for approachable video build guidance, and the fursuitmak.ing site for free beginner-oriented tutorials. The r/fursuit community on Reddit is consistently useful for troubleshooting questions and resource recommendations from experienced builders. Pattern-sharing communities are especially valuable for first-time head builders who want a proven starting template rather than drafting everything from scratch, and most reputable makers are active in these spaces, which makes vetting a studio before commissioning surprisingly straightforward. For a compact explainer that covers the basic steps and budget considerations for a full DIY build, see this Make a Fursuit explained walkthrough, and for step-by-step video guidance you can follow along with, try this video build guide.
Ready to start your first build?
Use this fursuit beginner guide to nail down your fursuit type, set a realistic budget before you commit to anything, and get a clear picture of the construction workflow, whether you plan to build, buy premade, or commission something custom. The information is out there, and now you have the map.
If the Protogen aesthetic is what drew you here, Ruby Protogen Studios is the lowest-friction way in. The premade shop gives you immediate access to quality Protogen pieces across multiple categories and price points, while the custom commission path is there when you are ready to bring a specific character to life from scratch. You do not need to figure out the full custom process on day one, and that first time someone stops you across a convention hall to ask where you got your suit is closer than you think.
Browse the Ruby Protogen Studios premade shop to find a ready-to-ship Protogen build, or reach out about a custom commission and start the conversation about your character design today. If you want to see an example of a fully finished premade option with character rights, check this Premade Full Protogen Suit (comes with character rights).