Style
LED Fursuit Eyes: Best Kits, Styles, and Install Tips
Jun
Picture this: you’re walking the convention floor at Anthrocon with LED fursuit eyes that pulse and blink like a living machine intelligence. The crowd is thick and loud, and then someone rounds the corner in a Protogen suit with a visor that scans and reacts with every step. Every head turns. That’s what a well-built LED fursuit eyes system does. It doesn’t just light up a costume; it gives a character a face that moves, reacts, and commands a room.
LED fursuit eyes cover a wide range, from simple static glow bulbs that cost a few dollars to fully animated matrix displays with custom firmware and wireless control. The gap between those two ends of the spectrum is real, and knowing where you land before you start buying parts saves you money and frustration. Professional studios that specialize in Protogen visors build entire helmet identities around LED systems, treating the illuminated face panel as the primary design element rather than an afterthought. It sets the benchmark for what a polished LED integration actually looks like.
Understanding the different types of LED fursuit eyes is crucial for making the right choice for your character.
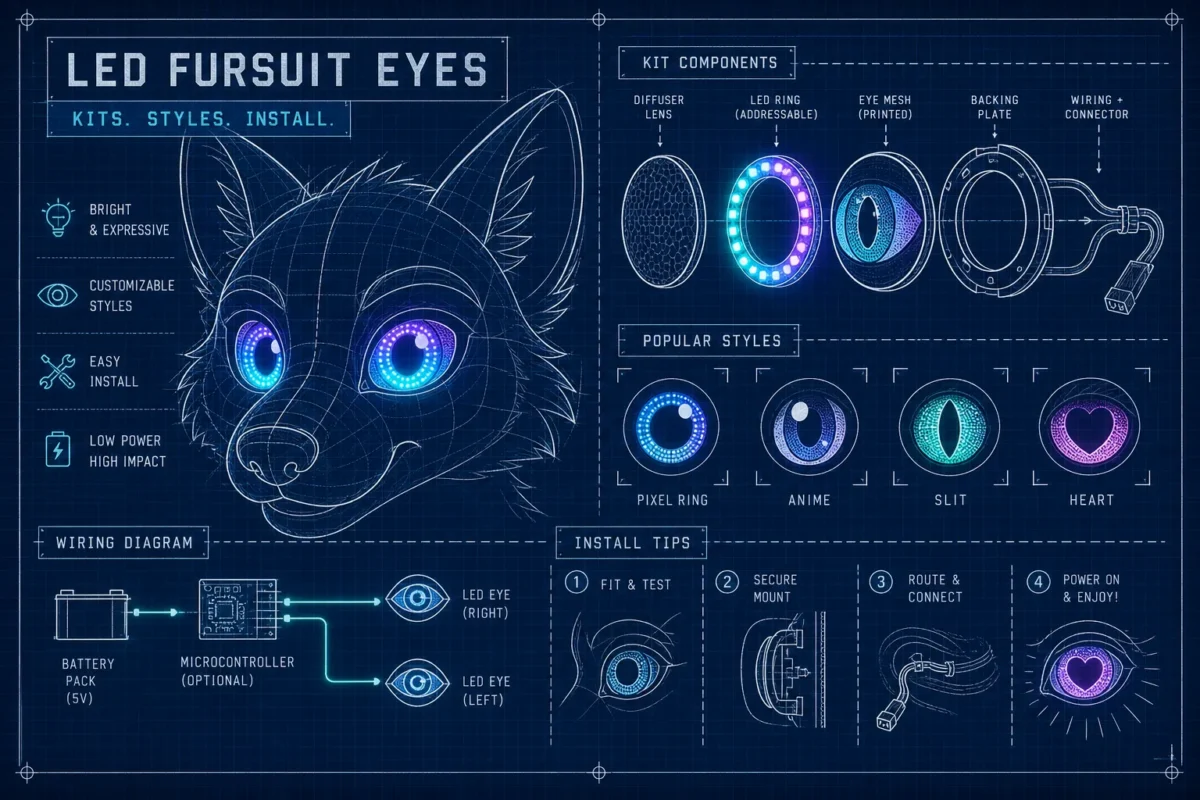
This guide covers everything you need to make a smart decision about LED fursuit eyes: the main eye styles and when each one makes sense, which materials work with LED fursuit eyes, what comes in a typical kit versus what you’ll still need to buy, a practical installation walkthrough, safety rules that prevent failures mid-convention, and a clear framework for deciding whether to build it yourself or invest in a studio build.
This guide covers everything you need to make a smart decision: the main eye styles and when each one makes sense, which materials work with LEDs, what comes in a typical kit versus what you’ll still need to buy, a practical installation walkthrough, safety rules that prevent failures mid-convention, and a clear framework for deciding whether to build it yourself or invest in a studio build.
When selecting your design, consider how LED fursuit eyes can enhance the overall appearance of your suit.
Static LED fursuit eyes are perfect for builders who want simplicity and reliability.
LED Fursuit Eyes: Main Styles Built Into Suits Today
For more dynamic designs, animated LED fursuit eyes can create an eye-catching effect at conventions.
Before you buy a single component, it helps to have a clear picture of what your options actually are. LED eye systems for fursuits fall into three distinct tiers, and each one serves a different builder, budget, and visual goal.
The expressive potential of LED fursuit eyes with matrix displays is unmatched, allowing for detailed animations.
Static LED Fursuit Eyes: Simple Glow, Zero Complexity
Consider the best materials for your LED fursuit eyes to ensure optimal light transmission and durability.
Finding the right blank for your LED fursuit eyes can save you time and resources.
Using acrylic for your LED fursuit eyes can enhance the overall appearance of your costume.
Static LEDs emit a single fixed color, usually white, red, or blue, at a constant brightness. There’s no animation, no color shift, and no controller required beyond a basic on/off switch. That simplicity is genuinely useful: static eyes use the lowest power draw of any LED option, require minimal wiring knowledge, and are the most reliable choice for first-time builders or anyone who prioritizes durability over visual drama. They suit toony aesthetics well and work cleanly in budget builds where troubleshooting time is more expensive than the parts themselves.
Glass can provide a stunning finish but should be used cautiously in your LED fursuit eyes design.
Animated and Color-Cycling LED Eyes
Make sure to consider the overall impact of your LED fursuit eyes when building your character.
Color-cycling and pulsing effects step up the visual impact significantly without requiring advanced programming. A basic PWM driver or small controller board handles the color transitions, shifting through hues slowly enough to read as bioluminescent or otherworldly rather than flashy. The difference between a static white glow and a slow cyan-to-violet cycle is immediately noticeable even at a distance. UV-reactive LED eyes occupy a niche here worth mentioning: under blacklights at after-dark convention events, they produce a crowd-pleasing glow effect that photographs dramatically and draws attention in low-light environments.
LED Matrix Displays: Commonly Used for Expressive Protogen Visors
A matrix display is a grid of individually addressable LEDs, typically WS2812B RGB pixels, that can render animated graphics, blinking expressions, scanning patterns, and scrolling text. For Protogen fursuits specifically, the visor is the face. Without a matrix, the character has no expressions to read; with one, it can blink, emote, and shift personality with every frame change. This is the premium tier: it requires a microcontroller (Arduino, ProtogenHelmet-ESP32, or similar), firmware, and a stable 5V power source, but no other LED style comes close to its visual output. Expect a higher power draw and more involved build time, but the result is a costume that performs rather than just glows.
Which Eye Materials Actually Work with LEDs
Choosing the wrong eye blank material wastes money quickly. The decision comes down to one practical question: how are you mounting the LED? Drilling into the blank, embedding during casting, or gluing externally each calls for a different material.
Installing LED fursuit eyes requires careful planning and execution for the best results.
Follow these steps to ensure your LED fursuit eyes are installed correctly.
Acrylic and Resin: The Builder’s Practical Pick
Acrylic offers high light transmission, a lightweight profile, and clean optical clarity that makes LED glow pop. You can drill it for rear wire routing, and it’s widely available in eye blank form from fursuit supply shops. The catch is chemical sensitivity: acetone and super glue cause crazing, which shows up as stress-cracking on the surface. Avoid cyanoacrylate on acrylic; prefer E6000 or silicone adhesive instead. Resin is slightly less optically clear but more flexible for builders because you can embed an LED during casting or drill after curing without the same cracking risk. For custom embedded builds, resin is the stronger choice; for straightforward back-drilled or surface-mount setups, acrylic works cleanly and costs less.
Make sure to test your LED fursuit eyes thoroughly before finalizing the installation.
Glass and Cabochon: Where Each Fits (and Where It Doesn’t)
Safety with your LED fursuit eyes is paramount during the installation process.
Glass offers excellent scratch resistance and optical clarity, but drilling it for LED wiring risks shattering. That limits glass eyes to decorative builds where the LED sits externally and is glued rather than threaded through the material. It’s not the right call for any build where the LED needs to be integrated into the eye itself. Cabochons serve a different function: they’re used as the domed front lens in resin-cast eye projects. A glass or acrylic cabochon transmits light well, is cheap to source in bulk, and pairs cleanly with an LED embedded behind it in a resin pour. Choose material based on your mounting method first, then on aesthetics second. That single rule prevents most compatibility mistakes before they happen.
Managing heat in your LED fursuit eyes design will help maintain performance.
What a Typical LED Eye Kit Includes and What You’ll Still Need to Buy
Ensure proper ventilation for your LED fursuit eyes to avoid overheating.
Entry-level LED fursuit eye kits sold on Etsy and specialty shops typically run between $20 and $50 for basic setups, with programmable or video-eye kits reaching $50 to $100 or more. Understanding what’s actually inside the box before you order prevents the frustrating experience of waiting on shipping only to realize you’re still missing half the parts you need.
The decision between ready-made or custom LED fursuit eyes depends on your project goals.
What Most Ready-Made Kits Come With
Most kits include pre-wired acrylic or resin eye blanks with LEDs already attached or embedded, an integrated driver circuit or pre-wired LED module, a basic on/off switch (usually built into the battery holder or wired inline), and short pre-stripped leads of roughly two to four inches ready to connect to a power source. Some mid-tier kits add a simple controller for brightness adjustment, but that’s not standard at the entry level. The core value of a kit is that the LED-to-eye pairing is already done for you, which removes the trickiest part of the process for beginners.
Parts Builders Almost Always Need to Source Separately
Batteries are the most consistent gap: almost no kit includes them. Depending on the kit’s voltage spec, you’ll need AA, AAA, or lithium coin cells, and a wired battery holder if one isn’t bundled. Extension wiring becomes necessary if the included leads are too short for deep helmet routing, which they often are. For matrix display builds, add an Arduino or dedicated LED controller, a USB power bank rated for the current draw, and the firmware or animation files that actually run the display. Mounting hardware deserves a separate line item: adhesive, brackets, and strain relief clips are rarely included and make the difference between a clean, stable install and a loose assembly that stresses wiring every time the head moves. For practical examples and parts photos, see Just a cool blog post with Images, rubyprotogenstudios.store.
Installing LED Fursuit Eyes: A Step-by-Step Walkthrough
The installation process below covers the most common scenario: wiring LEDs into pre-made acrylic or resin eyes and mounting them inside a foam or resin helmet shell. Work slowly, test frequently, and don’t skip the adhesive cure time.
Preparing the Eye and Mounting the LED
Consider how LED fursuit eyes will fit into your overall character design.
Start by assessing the eye blank. Hollow-backed eyes accept LEDs without modification; solid-backed eyes need a small drilled channel for the wiring to pass through. Use a 3mm LED for tight spaces, since larger packages are difficult to position precisely in a curved eye socket. Place a frosted diffuser, a thin piece of plexiglass or translucent plastic, between the LED and the eye face to soften the point-source effect and spread the glow more evenly across the lens. Secure the LED with E6000 or silicone, use tweezers to hold it precisely while the adhesive sets, and avoid cyanoacrylate on acrylic at every stage. For a visual walk-through of these steps, check the studio’s video guide: A Video Blog Post, rubyprotogenstudios.store.
Wiring, Battery Connection, and Final Testing
Strip the ends of 22, 24 AWG wire (select gauge by your expected current draw and run length; this range suits most low-current LED runs), solder to the LED legs (longer leg is positive), and insulate each joint with heat-shrink tubing before moving on. Route the wire run through the helmet interior toward your battery pack location, securing it with small glue dabs at intervals so it doesn’t flop against foam or fur during wear. Connect leads to the battery pack with polarity matched, and use a pack that includes an integrated on/off switch so the wearer can kill power without opening the helmet. Test before final foam or fur glue-down. Power on, check the glow, and adjust the LED angle if it looks off-center. Fixing a misaligned LED after the head is sealed takes significantly more time and effort than getting it right before close-out.
Safety and Durability Rules Every Builder Should Follow
Most LED eye failures at conventions trace back to the same handful of preventable mistakes. Following these rules keeps your build running through a full convention day without flickering, overheating, or dead eyes mid-photo op. For general guidance on ocular safety from LED exposure, see this overview of LED safety for eyes.
Managing Heat, Moisture, and Battery Placement
Investing in quality LED fursuit eyes will pay off in the long run for your fursuit build.
Keep power draw conservative and don’t push LEDs past their rated current. High-brightness arrays in a sealed helmet trap heat, which softens both foam and adhesive over extended wear. A practical target for enclosed helmet builds is 5V and under roughly 1A total draw. Treat the entire LED system as splash-sensitive: seal exposed solder joints and connectors with heat-shrink tubing or liquid electrical tape, and use sealed housings for battery packs if the suit will see outdoor use or light rain. Mount battery packs flat and stable, not compressed against foam. A loose pack shifts with every head movement and is one of the most common causes of intermittent LED failure and flickering at the worst possible moment.
Ventilation and Wire Management
Never seal the eye assembly completely. Leave a small gap or vent path so heat and condensation can escape, which matters most for matrix displays that generate more sustained heat than simple static LEDs. Use strain relief wherever wires pass through a foam channel or mesh grommet: repeated flexing without relief cracks solder joints and produces the kind of flickering that’s nearly impossible to diagnose quickly on a convention floor. Component quality makes a measurable difference here. Cheap, unregulated LEDs and drivers are significantly more likely to overheat or fail under sustained wear than reputable parts that cost a few dollars more at the source. If you’re planning a Raspberry Pi, based control route, the addressable RGB Raspberry Pi guide is a good technical starting point for wiring and software considerations.
Buy a Kit, Build Your Own, or Commission a Professional Build
The right answer depends on your build complexity, your skill level, and what outcome you actually need. Here’s how to think through each path clearly before you commit.
When a DIY Kit or Pre-Made Eye Blank Makes Sense
If your goal is a static or simple color-cycling build and you have basic soldering skills and a few hours to work through it, a kit from an Etsy seller or a specialty fursuit supply shop is a reasonable entry point. These builds are genuinely manageable for first-timers, especially when you’re adding lighting to an existing helmet base rather than designing the eye system from the structural stage. Budget-conscious builders who want to understand the craft and don’t mind some troubleshooting will find real value in starting here.
When a Professional Studio Build Is the Right Investment
Matrix displays, animated expressions, and full Protogen visor integrations are not beginner territory. The programming, wiring harnesses, controller calibration, structural integration, and ventilation design all require studio-level expertise to execute reliably. Customize your fursuit, rubyprotogenstudios.store specializes in exactly this kind of work. Their LED Protogen heads are built with the visor system as a core design element from the very start, not added on after the fact. The electronics are integrated during structural planning, with proper ventilation, managed wiring runs, and a breathable interior that keeps both the wearer and the components performing at full convention pace all day.
If you want LED fursuit eyes that look polished on camera and hold up through full-day convention wear, a custom or premade LED Protogen head from Ruby Protogen Studios removes the guesswork entirely. Browse the current premade inventory or start a custom commission inquiry to get a build designed around your character from the first planning stage.
Make the Call That Fits Your Build
Choosing the right approach comes down to a few clear factors:
- Static eyes suit simple builds and first-time makers.
- Color-cycling ramps up visual drama without adding much wiring complexity.
- Matrix displays are the go-to choice for expressive Protogen visors, animated and fully programmable, but they require real technical investment to execute correctly.
- Material choice follows your mounting method: resin for embedded builds, acrylic for back-drilled setups, glass only for external LED attachment.
- Most kits cover the eye blank and driver; source batteries, extension wiring, and mounting hardware separately.
For simple builds, a kit and a weekend are enough. For complex LED eye integrations with animated matrix displays and full visor design, the investment in studio craftsmanship pays for itself in reliability, performance, and a finished result that holds up under real convention conditions. When you’re ready for LED fursuit eyes that handle all of that from the inside out, Ruby Protogen Studios is the place to start.